ssh服務可以很方便的通過網絡登錄到linux開發板,同時支持sftp協議向開發板傳輸文件。下面簡單講下移植過程。
開發板環境:
名稱:imx283內核:Linux2.6.35.31.下載源碼zlib下載openssl下載openssh下載
建議先下載openssh,openssh也不要下載最新版本,zlib和openssl的版本最好早于openssh的版本,因為openssh的編譯會用到zlib和openssl生成的庫 ,若zlib和openssl的版本比openssh新,可能在編譯openssh時出現不兼容等問題。
我這里下載的是zlib-1.2.8、openssl-1.0.2、openssh-7.1p1。
2.zlib編譯
解壓zlib-1.2.8,進入zlib根目錄
1>./configure –Static –prefix=/test/open-ssh/zlib/ 生成makefile
–static 表示生成靜態庫 也可以使用–share生成動態庫
–prefix 指定make install的安裝目錄2>修改makefile 更換編譯器為交叉編譯器 CC=arm-fsl-linux–gnueabi-gcc LDSHAred=arm-fsl-Linux-gnueabi-gcc CPP=arm-fsl-linux-gnueabi-gcc -E AR=arm-fsl-linux-gnueabi-ar
3>make 4>make install
3.openssl編譯
解壓openssl源碼,進入源碼根目錄
1.配置 openssl的新舊版本配置方式有點不同,具體配置方式可以查看./configure -h
1.1.1版本配置:
代碼語言:JavaScript代碼運行次數:0運行復制
./Configure linux-generic32 no-asm shared no-async --prefix=/test/open-ssh/open-ssl1/ CROSS_COMPILE=/ZLG_linux/gcc-4.4.4-glibc-2.11.1-multilib-1.0/arm-fsl-linux-gnueabi/bin/arm-fsl-linux-gnueabi- CC=gcc -fPIC
linux-generic32:32位系統 no-asm:在交叉編譯過程中不使用匯編代碼代碼加速編譯過程 shared:生成動態連接庫 no-async:不使用GNU的ucontext庫 交叉編譯工具鏈沒有提供GNU C的ucontext庫 –prefix:指定install輸出的目錄 CROSS_COMPILE:指定編譯器,需要絕對路徑 -fPIC全稱是position Independent Code,用于生成位置無關代碼,代碼無絕對跳轉,都是相對跳轉。
1.0.2版本配置:
代碼語言:javascript代碼運行次數:0運行復制
./Configure --prefix=/test/open-ssh/open-ssl/ os/compiler:/ZLG_linux/gcc-4.4.4-glibc-2.11.1-multilib-1.0/arm-fsl-linux-gnueabi/bin/arm-fsl-linux-gnueabi-gcc
–prefix 指定make install的安裝目錄
這里交叉編譯器路徑最好使用絕對路徑
2.編譯 make 3.安裝 make install
4.openssh編譯
解壓openssh源碼,進入源碼主目錄
1.配置 生成MakeFile
代碼語言:javascript代碼運行次數:0運行復制
./configure --host=arm-fsl-linux-gnueabi --with-libs --with-zlib=/test/open-ssh/zlib --with-ssl-dir=/test/open-ssh/open-ssl --disable-etc-default-login CC=arm-fsl-linux-gnueabi-gcc AR=arm-fsl-linux-gnueabi-ar
這里需要指定剛剛安裝的zlib和openssl目錄
2.編譯
make
5.拷貝openssh相關文件和密鑰
這部分工作包括新建文件夾、將生成的sshd相關工具拷貝到各個文件夾、生成密鑰。我把這些寫成了一個shell腳本pack.sh,該腳本首先新建一個usr文件夾,然后在usr下新建需要的各級子文件夾,接著會生成需要的密鑰并把需要的sshd相關工具和密鑰拷貝到這些文件夾,最后將usr下所有文件打包 并生成usr.tar.bz2壓縮包。
注意:pack.sh需要放在openssh源碼根目錄下運行
代碼語言:javascript代碼運行次數:0運行復制
#!/bin/bashfile_a="scp sftp ssh ssh-add ssh-agent ssh-keygen ssh-keyscan" file_b="moduli ssh_config sshd_config" file_c="sftp-server ssh-keysign"key="ssh_host_rsa_key ssh_host_dsa_key ssh_host_ecdsa_key ssh_host_ed25519_key" mkdir -p usr/local/bin usr/local/etc usr/libexec mkdir usr/sbin/for i in $file_adoif [ -f $i ];thencp $i usr/local/bin/echo "cp $i ok" elseecho "error:$i not exist " exit_script fidonefor i in $file_bdoif [ -f $i ];thencp $i usr/local/etc/echo "cp $i ok"elseecho "error:$i not exist"exit_script fidonefor i in $file_cdo if [ -f $i ];then cp $i usr/libexec echo "cp $i ok" else echo "error:$i not exist" exit_script fidoneif [ -f "sshd" ];thencp sshd usr/sbin/echo "cp sshd ok"elseecho "error:sshd not exist"exit_scriptfi# ssh_host_rsa_keyif [ -f "ssh_host_rsa_key" ];thenecho "ssh_host_rsa_key exist"cp ssh_host_rsa_key usr/local/etc/echo "cp ssh_host_rsa_key ok" elsessh-keygen -t rsa -f ssh_host_rsa_key -N ""cp ssh_host_rsa_key usr/local/etc/echo "cp ssh_host_rsa_key ok" fi# ssh_host_dsa_keyif [ -f "ssh_host_dsa_key" ];thenecho "ssh_host_dsa_key exist"cp ssh_host_dsa_key usr/local/etc/echo "cp ssh_host_dsa_key ok" elsessh-keygen -t dsa -f ssh_host_dsa_key -N ""cp ssh_host_dsa_key usr/local/etc/echo "cp ssh_host_dsa_key ok" fi# ssh_host_ecdsa_keyif [ -f "ssh_host_ecdsa_key" ];thenecho "ssh_host_ecdsa_key exist"cp ssh_host_ecdsa_key usr/local/etc/echo "cp ssh_host_ecdsa_key ok" elsessh-keygen -t ecdsa -f ssh_host_ecdsa_key -N ""cp ssh_host_ecdsa_key usr/local/etc/echo "cp ssh_host_ecdsa_key ok" fi# ssh_host_ed25519_keyif [ -f "ssh_host_ed25519_key" ];thenecho "ssh_host_ed25519_key exist"chmod 600 ssh_host_ed25519_keycp ssh_host_ed25519_key usr/local/etc/echo "cp ssh_host_ed25519_key ok" elsessh-keygen -t dsa -f ssh_host_ed25519_key -N ""chmod 600 ssh_host_ed25519_keycp ssh_host_ed25519_key usr/local/etc/echo "cp ssh_host_ed25519_key ok" fitar -cjvf usr.tar.bz2 usr/*echo "pack usr to usr.tar.bz2 ok"
生成usr.tar.bz2壓縮包之后,將該壓縮包拷貝到開發板的根目錄下并解壓,壓縮包內的usr目錄會和開發板根目錄下的usr合并。
6.拷貝openssh運行需要的動態庫
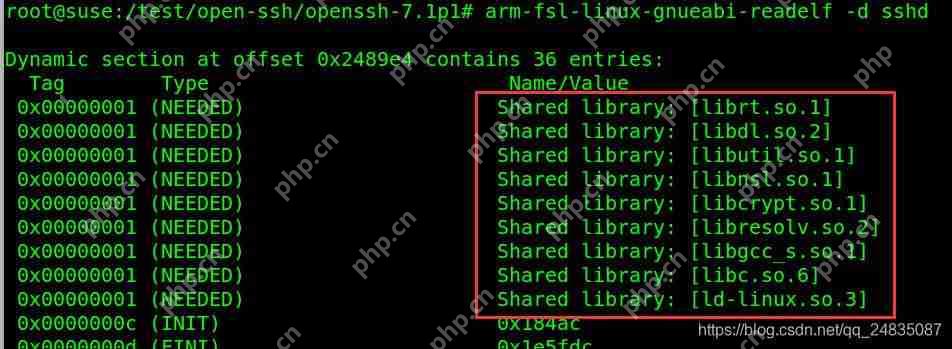
首先可以在openssh源碼根目錄下運行:arm-fsl-linux-gnueabi-readelf -d sshd 就可以知道sshd需要哪些動態庫

如果你開發板的文件系統能夠運行起來,那么其中的大部分庫應該是有的,缺少的可能是libcrypt.so.1和libz.so.1,libcrypt.so.1在openssl源碼根目錄下可以找到,libz.so.1在libz源碼的根目錄下。將缺少的庫拷貝到開發板/lib下即可。
7.修改SSHD配置、增加root用戶密碼將開發板/usr/local/etc/sshd_config,將PermitRootLogin yes前的注釋“#”號去掉,若沒有這一句,增加這一句即可。開發板執行passwd root,給root用戶增加密碼,若之前有密碼,這一步可跳過。開發板打開 /etc/passwd 文件,在最后添加一行:sshd:x:74:74:Privilege-separated SSH:/var/empty/sshd:/sbin/nologin開發板打開/etc/init.d/rcS,在最后增加一句:/usr/sbin/sshd &,讓ssh服務開機在后臺啟動(必須保證此時網卡已經配置好,否則啟動ssh服務需要放到網卡配置后面)
最后重啟開發板!
8.測試
首先執行ps,看下ssh服務是否已經啟動

用secureCRT或者其他ssh工具連接開發板!
部分用xshell工具的同學可能會遇到下面的問題:
WARNING! The remote SSH server rejected X11 forwarding request. 解決辦法:xshell——會話——屬性——隧道——取消勾選X11轉發
參考博客:
1.成功移植 SSH 服務到 ARM 開發板上
2.移植 ssh 到開發板
3.12個移植OpenSSH 到 ARM Linux 開發板上常見錯誤總結


